Setting up a planted aquarium
Setting up a planted aquarium big or small can be a daunting task but do not fear – our step by step guide will help you get a fantastic finished tank. It will take sometime to get it right before we add the plants and water and its key to have an idea of how you want the tank to look. Follow our guide and you’ll have a beautiful aquarium in no time at all.
When planning your aquarium, be mindful of what you’ll do to avoid water spills during cleaning and for water leaks. You do not want your new aquarium bringing in unwanted, intrusive moisture that leads to other issues in your home. We’ve seen large aquarium projects that were not planned properly that produced a large amount of chronic moisture and water seepage. This can lead to all kinds of problems, including damage to wood in your home, damage to structural supports, and damage brought about by termites attracted to the excess moisture and dampness. You don’t want to end up with a termite colony to go along with your new aquarium – the expense and process for getting rid of them can be a nightmare. Companies like Skill Termite can help in getting rid of any new unwanted pests brought in by your aquarium’s moisture!
How to setup a planted aquarium step by step guide
What you’ll need to get started –
Tank – We’re using a Fluval Flex 34L for this project
Substrate – We’re JBL Aqua basics plus as a base fertilizer – You can buy it on Amazon here.
Gravel – If required.
Step 1 – plan it out
We’ve mentioned it previously on other tank reviews but having a clear plan makes for a better finish. You can even do a rough stench of how you’d like it to look and then use that as a guide to refer back too.
Things to consider putting in your design
- Rocks – size and where, generally you want the bigger rocks at the back of the tank.
- Plants – What size or colour, do you want to cover any gravel in grass like plants?
- Wood – Driftwood is popular and makes a good effect in a planted aquarium
- Do you want a river effect? This is created by adding a different colour stone to the bottom to create the appearance of a river.
As you can see below I’m a terrible drawer but if you follow the blog along you can see how this rubbish drawing gets transformed into a beautiful aquarium. 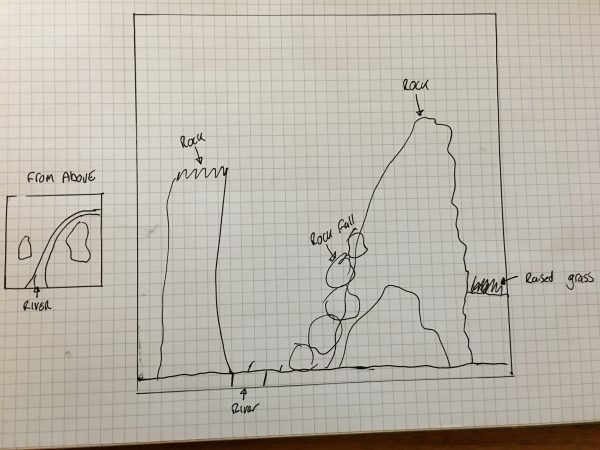
What I decided on was a 2 larger rock tank with a gap down the middle with a river flowing through.
The rock fall will create places for grass and other plants and there will be a raised plant section on the right, created using the rocks.
The river will be along the bottom of one of the rocks creating (hopefully) what looks more like a ravine that drops down into a river below.
Please note, I already had rocks in these shapes spare from another project so it can be worth buying your chosen rocks first and designing around them rather then trying to find the correct rocks.
Step 2 – Lay it out
Once you’ve got your plan its then time to lay it out and see how it looks.
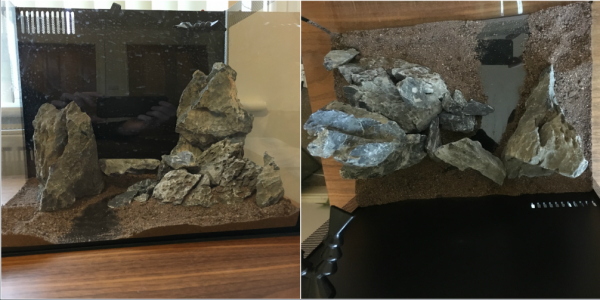
Put some of the soil or substrate in the bottom to stand the rocks in and be careful not to let the rocks drop or crash into the glass – they’re not as stable as when there’s water in the tank!
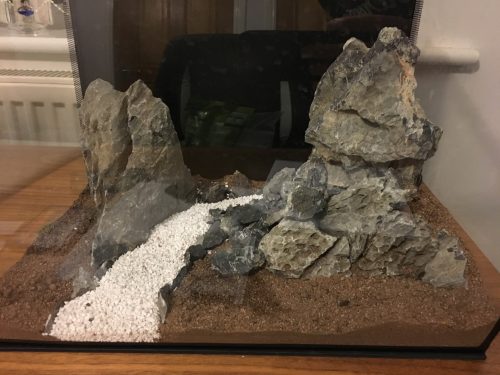
As you can see below I’ve added the rocks in position but not secured them and moved the JBL aqua substrate away where I’m planning to have the river effect.
It looks good to have it wider near the front of the tank and then appearing to tail away giving a sense of perspective.
My next bit of advice for your planted aquarium may seem odd but its worth it – Just leave the tank with its stones in for 2/3 days.
Take some time to look at it and make sure you’re 100% happy with it – You’re going to be looking at it for a very long time to come so making sure its right now is a huge benefit.
With my tank above after leaving it on my desk (where its going to be for a while) I’ve added a couple of extra rocks to the rock fall including one going balanced between one rock and the other as shown below.
I’ve also added a couple of very small bits of wood which in my mind will look like fallen trees where there’s been a rock fall.
It’s much easier to do this now and get it right than try and change it in 3 months time once its all established.
In my own tank I added an extra rock balanced across the canyon and a plateau at the site to create another level of hight in the tank (see below)
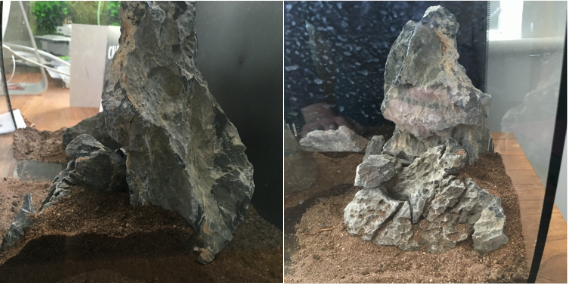
Now I’m happy with it I’ve used an aquatic silicone to secure some of the bigger rocks in place.
You don’t really need to do this for me its purely for the rocks on the cliff so they don’t fall and for the stone keeping the soil in for the plateau.
The stones in the rock fall won’t all be filled with soil and planted leaving some small cave like spaces for the shrimp to live in.
Again I’ve let is sit for a couple of days, just because I’ve not had time but is good to make sure you’re 100% happy.
Step 3 – Consider other features
Now the stones are in place then its time to think about the final look of the tank and if you want any additional features to be added.
For my small planted aquarium I’ve settled on a path/ river effect in a contrasting stone to give a feeling of perspective in the tank.
This is not something you have to do and a full grass bottom can look equally as effective.
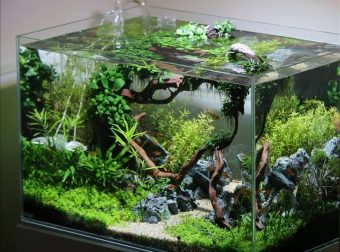
Here’s an example of a finished tank with a path feature in the middle (This isn’t one of mine but I’ll update the picture once mine is completed).
For my design I’ve edged the river in more seryu rock thats been broken up – with a hammer – into smaller pieces just to keep it separate.
I’ve written a separate blog about adding a path feature that you can read here.
Step 4 – Add the soil
Top tip – Don’t make the soil all at the same level! Mix it up to create different heights and a much more natural under water look.
Pour the soil in slowly, I do it with a folded piece of paper and just add small amounts at a time to build it up. If you have no preference on where the ridges are then just leave it as it falls.
If you’re not happy with it them more it around some more until you are – but DO NOT flatten it out!
After looking at it for a while I thought the left side behind the rock was a little flat so I added a bit more of a hill feature.
Step 5 – Adding some water and plants
Now is the time to start the planting and again patience is key, its not just a case of chucking the water in and sticking the plants in and off you go.
You can do the plants before you add the water but I prefer to get the soil wet first and have about an inch of water to plant in.
This makes it easier to check the plants won’t float out of the soil as soon as you add the water.
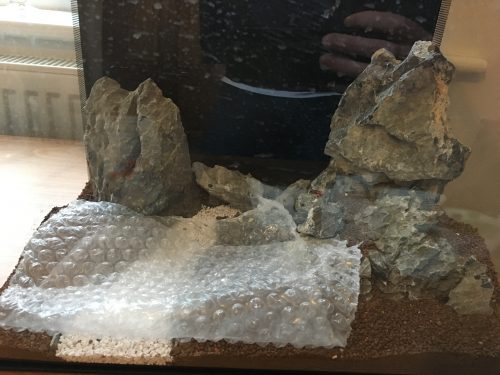
Top tip – DO NOT POUR WATER DIRECTLY ON THE SOIL!
Lets say you’ve taken your time and got your perfect setup with a nice path built in – pouring water directly on the soil, even slowly, will ruin your look.
The trick is to get a bit of bubble wrap and slowly pour the water on this, which allows the water to run off the side and won’t disturb your soil – as long as you go slowly enough.
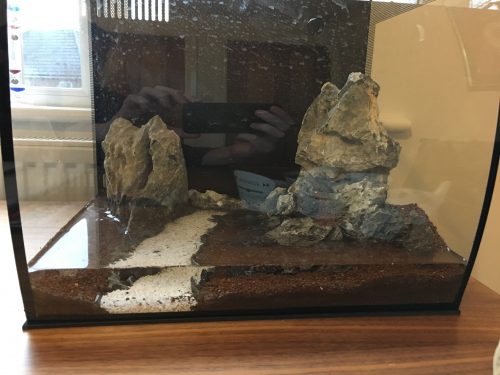
Fill it to a level where you can still plant, around an inch as shown below and give it a little time for the water to soak the soil.
From experience this will mean less soil floats to the top when you start planting.
You’re then ready to start planting out your tank. I’ve use 1-2 grow plants from tropica, mainly dwarf hair grass as its an easy one to get started with and a fast grower. Mixed with some Marsilea to grow on the rocks.
The plants need to be cleaned off and cut into 6-8 according to the packaging.
I personally go for mixed sized clumps with some bigger and some smaller as they can get established easier like this and it makes planing easier in tight spaces – bigger ones in the open areas and smaller ones in the tight gaps.
I’ve done a separate blog on planting in a small aquarium here.
Top tip – The plants don’t need warm water – There’s no need to kick in the filter or heater just yet (if its a subversive heater it will burn out if you’ve not got it completely covered in water.
The plants are fine in cold water for a while.
Once the plants are in then top up the water just enough to cover all the leaves.
Then I leave it for a couple of days to settle, you’ll notice air bubbles coming out of the soil slowly.
The reason for doing this is to give the plants a little time to establish in the water before adding fish and kicking in the filter.
Over the coming days I keep toping up the water by an inch or so at a time – always remembering to pour on to the bubble wrap so as to not disturb the stones.
Then over time it will be full and looking like this (I’ve still not got the heater or the filter on).
In this picture you can’t quite see at the top but on of the grass bundles have come out and is floating around.
As its only one I’ve not replanted it but if you have a couple come out its worth replanting to avoid any big gaps in the planting.
Step 6 – Run the tank
I know by now you’ll be keen to get some fish in the tank but its best to get the filter and heater on now and let it run for 3-4 days first.
Add a thermometer and make sure its at a good stable temperature for at least a day when your ready to add the fish or shrimp.
Then its the fun time, start with a couple and build the stock up over a couple of weeks rather than buying them all at ones.
I’ve written a guide on the best fish for small aquariums here, which should give you an idea about what to stock.
Try and avoid anything big or aggressive that will disturb the plants whilst they’re getting established.
There’s no need to add an algae eater as the first fish, just pick something easy to keep like guppies or any of the raspboras.
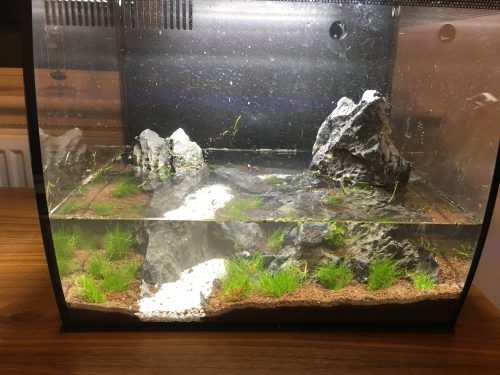
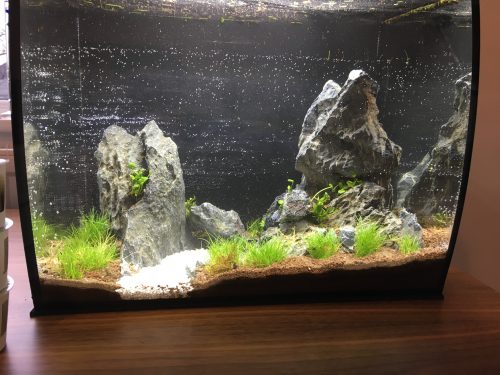
The finished tank
After running it for 6 weeks with some added co2 to get the plants growing (Click here for the Co2 in small tanks blog) here’s what the finished tank looks like.
If you refer back to the original drawing you’ll see this is very close to the planned design.
